Last spring, I watched my neighbor’s tomatoes absolutely dwarf mine—same variety, same weather, but his plants looked like they belonged in a gardening magazine while mine struggled to reach my waist. The secret? He’d been adding mycorrhizae to his soil for years, creating an underground network I never knew existed.
How to add mycorrhizae to soil isn’t just another gardening trend—it’s like giving your plants a personal shopping service for nutrients. These beneficial fungi form partnerships with plant roots, essentially extending their reach and dramatically improving their ability to absorb water and nutrients from the soil.
In this guide, you’ll discover exactly how to introduce these microscopic helpers to your garden, when to apply them for maximum impact, and which products actually deliver results. Whether you’re growing vegetables, flowers, or trying to revive struggling houseplants, mastering mycorrhizae application can transform your gardening success.
What Exactly Are Mycorrhizae and Why Should You Care?
Think of mycorrhizae as nature’s internet for plants. These fungal networks connect plant roots to a vast underground web that can extend hundreds of times beyond what the roots alone could reach. The relationship is beautifully symbiotic: plants share sugars they create through photosynthesis, while the fungi deliver water, phosphorus, nitrogen, and other essential nutrients.
There are two main types you’ll encounter:
- Endomycorrhizae (arbuscular): These actually penetrate root cells and work with most vegetables, grasses, and flowering plants
- Ectomycorrhizae: These form a sheath around roots and prefer trees like pines, oaks, and birches
For most home gardeners, endomycorrhizae are your go-to choice since they benefit about 90% of plant species.
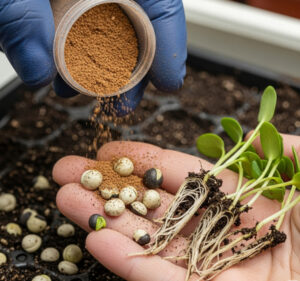
The Step-by-Step Process: How To Add Mycorrhizae To Soil
Method 1: Direct Soil Application (Most Popular)
For new plantings:
- Dig your planting hole as you normally would
- Sprinkle granular mycorrhizae directly onto the root ball or into the planting hole (typically ¼ to ½ teaspoon per plant)
- Ensure direct contact between the inoculant and roots—this is crucial
- Backfill with native soil and water thoroughly
For established plants:
- Create small holes around the drip line using a soil auger or screwdriver
- Apply mycorrhizae into these holes (about 6-8 holes per plant)
- Water deeply to activate the spores
Method 2: Seed Treatment
This method gives your plants the earliest possible advantage:
- Mix seeds with mycorrhizal powder in a small container
- Add a few drops of water to create a light coating
- Plant immediately while the coating is still moist
- Water gently to avoid washing away the inoculant
Method 3: Root Dipping for Transplants
Perfect for seedlings and bare-root plants:
- Create a slurry by mixing soluble mycorrhizae with water (follow package directions)
- Dip roots for 10-15 seconds, ensuring complete coverage
- Plant immediately to prevent the fungi from drying out
Timing Your Mycorrhizae Applications
The golden rule: earlier is always better. Mycorrhizae work best when introduced during the plant’s most vulnerable stages.
Optimal timing:
- Seed starting: Mix with potting soil or treat seeds directly
- Transplanting: Apply during the planting process
- Early spring: Before plants break dormancy
- Fall planting: Gives fungi time to establish over winter
Less effective timing:
- Mid-summer on established plants (though still beneficial)
- During plant stress periods
- In extremely dry or waterlogged conditions
Product Types and Application Methods
| Product Type | Best For | Application Rate | Pros | Cons |
|---|---|---|---|---|
| Granular | Large areas, trees, shrubs | 1-2 tsp per plant | Easy storage, long shelf life | Requires soil contact |
| Soluble Powder | Seeds, hydroponics, root dips | 1 tsp per gallon | Versatile application | Shorter shelf life once mixed |
| Liquid Concentrate | Quick establishment, foliar feeding | Follow label directions | Fast acting | More expensive per application |
| Root Dip Gel | Transplants, cuttings | Dip and plant | Maximum root contact | Limited to transplant scenarios |
Common Mistakes That Kill Your Investment
After talking with dozens of gardeners who’ve tried mycorrhizae with mixed results, these mistakes come up repeatedly:
The “more is better” trap: Over-application doesn’t increase benefits and wastes money. Stick to recommended rates.
Storage neglect: Mycorrhizal spores are living organisms. Store products in cool, dry places and check expiration dates.
Fertilizer conflicts: High-phosphorus fertilizers can actually inhibit mycorrhizal development. If your soil is already phosphorus-rich, the fungi won’t establish well.
Watering immediately after: While you want soil moisture, flooding can wash away spores before they attach to roots.
Maximizing Your Mycorrhizae Investment
Create the Right Environment
Mycorrhizae thrive in conditions that support overall soil health:
- Maintain soil pH between 6.0-7.0 for most applications
- Reduce tillage to avoid disrupting fungal networks
- Add organic matter like compost to feed beneficial microorganisms
- Avoid overuse of fungicides which can harm beneficial fungi
Monitor for Success
You won’t see mycorrhizae directly, but healthy plants show telltale signs:
- Improved drought tolerance
- Reduced transplant shock
- Enhanced nutrient uptake (greener foliage)
- Better root development
- Increased resistance to soil-borne diseases
When Mycorrhizae Won’t Work
Not every situation benefits from mycorrhizal inoculants:
Plants that don’t form mycorrhizal relationships:
- Brassicas (cabbage, broccoli, kale)
- Spinach and other Amaranthaceae family plants
- Some sedges and rushes
Soil conditions that inhibit establishment:
- Extremely high phosphorus levels
- Waterlogged or consistently wet soils
- Recently fumigated or sterilized growing media
- Heavily salted soils
Product Recommendations for Different Scenarios
For vegetable gardens: Look for products containing Glomus species, particularly Glomus intraradices and Glomus mosseae.
For trees and shrubs: Choose products with both endo and ectomycorrhizae for broader compatibility.
For container gardening: Soluble products work best since you can control application precisely.
For organic gardens: Verify OMRI (Organic Materials Review Institute) certification on product labels.
Conclusion
Adding mycorrhizae to soil isn’t magic, but it’s pretty close. This simple addition creates an underground support system that can dramatically improve plant health, reduce water needs, and increase yields. The key is applying the right product at the right time with proper root contact.
Start small with a few plants to see the difference for yourself. Once you witness the improvement in plant vigor and resilience, you’ll understand why experienced gardeners consider mycorrhizae essential rather than optional.
Have you tried adding mycorrhizae to your soil? Share your experiences in the comments below, and don’t forget to bookmark this guide for your next planting season!
Frequently Asked Questions
How long does it take for mycorrhizae to work after application?
Initial colonization begins within 2-4 weeks, but you’ll typically notice improved plant performance after 6-8 weeks. The full benefits develop over an entire growing season as the fungal network establishes.
Can I add mycorrhizae to potting soil for houseplants?
Absolutely! Mix granular mycorrhizae into potting soil before planting, or apply soluble forms during regular watering. Container plants often benefit even more than garden plants since their root systems are restricted.
Do I need to reapply mycorrhizae every year?
In perennial gardens with minimal soil disturbance, established mycorrhizal networks can persist for years. However, annual gardens benefit from yearly applications, especially in areas where soil is regularly turned or amended.
Will mycorrhizae work in hydroponic systems?
Traditional soil-based mycorrhizae don’t work in pure hydroponic setups, but specialized liquid formulations designed for soilless systems are available. These products contain different beneficial microorganisms suited to hydroponic environments.
Can I use mycorrhizae with chemical fertilizers?
Yes, but timing matters. High-phosphorus fertilizers can inhibit mycorrhizal establishment, so apply mycorrhizae first and wait 2-3 weeks before using phosphorus-heavy fertilizers. Balanced, moderate fertilization actually supports the symbiotic relationship.
How do I know if my soil already has beneficial mycorrhizae?
Most undisturbed soils contain some native mycorrhizae, but their populations and diversity may be low. Soil testing labs can perform mycorrhizal assessments, though for most gardeners, the cost-benefit of adding commercial inoculants makes testing unnecessary.